Showing posts with label recipes. Show all posts
Showing posts with label recipes. Show all posts
Sunday, January 17, 2016
Teriyaki Chicken Thighs Pressure cooker
If you want a lot and don't mind leftovers, fill the pot up with the frozen chicken thighs, then cover the chicken with, let's say, 2 to 3 cups of the Yoshida sauce. Add 3 Tablespoons of sesame seeds (optional). Pressurize for 25 or 30 minutes on high. I'm not sure if that is too much time...20 minutes was plenty for my half-full cooker though. (That is the pressured cooking time; there will be additional time for the cooker to heat up.) For the rice will you be using a rice cooker? Most rice cookers come with a scoop, and if you have one of those, use at least four scoops of dry rice, maybe five, with the correct amount of water (whatever the cooker tells you).


Sunday, September 21, 2014
APRICOT JAM GLAZE FOR CHICKEN
Apricot
Glazed Chicken
Servings: 4
Ingredients
— 1/4 cup low sodium soy sauce
— 2 Tbsp. vegetable oil
— 2 Tbsp. cider vinegar
— 2 cloves garlic, minced
— 1 Tbsp. fresh ginger, peeled and minced
— 1/4 tsp. salt
— 1/4 tsp. black pepper
— 1/4 tsp. crushed red pepper flakes
— 2/3 cup apricot jam
— 4 bone-in chicken breast pieces
— 1/4 cup low sodium soy sauce
— 2 Tbsp. vegetable oil
— 2 Tbsp. cider vinegar
— 2 cloves garlic, minced
— 1 Tbsp. fresh ginger, peeled and minced
— 1/4 tsp. salt
— 1/4 tsp. black pepper
— 1/4 tsp. crushed red pepper flakes
— 2/3 cup apricot jam
— 4 bone-in chicken breast pieces
Instructions
1. Whisk together soy sauce, vegetable oil, vinegar, garlic, ginger, salt, black pepper, red pepper flakes and apricot jam to make a marinade.
2. Place chicken in a resealable plastic bag; pour marinade over chicken. Marinate in the refrigerator for at least one hour.
3. Remove chicken from marinade. Grill chicken approximately 6 minutes on each side, basting with leftover marinade until the chicken reaches an internal temperature of 160° F. Refrigerate any leftovers.
1. Whisk together soy sauce, vegetable oil, vinegar, garlic, ginger, salt, black pepper, red pepper flakes and apricot jam to make a marinade.
2. Place chicken in a resealable plastic bag; pour marinade over chicken. Marinate in the refrigerator for at least one hour.
3. Remove chicken from marinade. Grill chicken approximately 6 minutes on each side, basting with leftover marinade until the chicken reaches an internal temperature of 160° F. Refrigerate any leftovers.
Saturday, September 20, 2014
Homemade Prego Tomato Sauce
Homemade
Prego Spaghetti Sauce
Excellent result with this recipe
and it tastes just like my favorite Prego!
4 T. olive oil
2 large minced garlic cloves
1 onion, very finely chopped
2 tsp. dried basil
2 tsp. dried parsley
1 tsp. ground black pepper
1 tsp. dried oregano
2 tsp. salt
7 cups chopped fresh from the garden tomatoes (or 56 oz. canned crushed toms)
1 (28 oz.) can tomato paste
1 (28 oz.) can tomato sauce
1/4 cup granulated sugar
Heat oil over medium low heat. Add garlic. Stir and cook until golden brown. Be careful not to burn garlic. Add onion and cook until soft and golden, stirring frequently. Add seasonings and tomatoes. Slowly bring to a boil on medium high heat. Let boil for 10 minutes, covered. Reduce to lowest heat. Cover and simmer 1 hour, stirring occasionally.
Yield: 12 cups or 3 quarts canned
Canning: Fill hot sauce in hot jars and process in pressure canner for 25 minutes.
Note: I simmered my fresh tomatoes for 20 minutes but I'm not sure it would matter especially if you are canning the sauce as well.
4 T. olive oil
2 large minced garlic cloves
1 onion, very finely chopped
2 tsp. dried basil
2 tsp. dried parsley
1 tsp. ground black pepper
1 tsp. dried oregano
2 tsp. salt
7 cups chopped fresh from the garden tomatoes (or 56 oz. canned crushed toms)
1 (28 oz.) can tomato paste
1 (28 oz.) can tomato sauce
1/4 cup granulated sugar
Heat oil over medium low heat. Add garlic. Stir and cook until golden brown. Be careful not to burn garlic. Add onion and cook until soft and golden, stirring frequently. Add seasonings and tomatoes. Slowly bring to a boil on medium high heat. Let boil for 10 minutes, covered. Reduce to lowest heat. Cover and simmer 1 hour, stirring occasionally.
Yield: 12 cups or 3 quarts canned
Canning: Fill hot sauce in hot jars and process in pressure canner for 25 minutes.
Note: I simmered my fresh tomatoes for 20 minutes but I'm not sure it would matter especially if you are canning the sauce as well.
Tuesday, September 16, 2014
http://thepioneerwoman.com/cooking/2014/09/shells-cheese-and-bacon-and-peas/
http://thepioneerwoman.com/cooking/2014/09/shells-cheese-and-bacon-and-peas/
ometimes you feel like making macaroni and cheese that involves whipping up a roux, then making a white sauce, then adding cheese to make it a cheese sauce.
And sometimes you don’t.
This ultra-simple, kid-friendly recipe for pasta shells and cheese is absolutely scrumptious and so darn easy to make.
The secret’s in the (artisan cheese) sauce.
Just you wait, ‘enry ‘iggins. Just you wait…
 First, boil up some pasta! These are just good ol’ medium pasta shells, but you can use the small shells if you want.
 Next, make the gourmet cheese sauce: Add 2 cups of milk (I used 2%) to a saucepan…
 And
add a pat or two of buttah! And that’s basically the basic basis for
the cheese sauce, basically. Note that there’s no flour, there’s no
roux, and there’s no white sauce. And that’s what’s so beautifully
simple about this recipe!
And
add a pat or two of buttah! And that’s basically the basic basis for
the cheese sauce, basically. Note that there’s no flour, there’s no
roux, and there’s no white sauce. And that’s what’s so beautifully
simple about this recipe!
 Heat this mixture over medium-low heat until the milk is heated and the butter is melted.
 And
now, for the artisan cheese blend, which you can only get from
specialty gourmet mail order catalogs: Start with a hunka hunka burnin’
Velveeta. And actually, it would be best if it wasn’t burnin’. Just
straight out of the tight foil wrapper is best.
And
now, for the artisan cheese blend, which you can only get from
specialty gourmet mail order catalogs: Start with a hunka hunka burnin’
Velveeta. And actually, it would be best if it wasn’t burnin’. Just
straight out of the tight foil wrapper is best.
 And
by the way…have you ever, just for fun, suspended a hunk of Velveeta
from a height of a few inches, then released the Velveeta to see if it
would bounce?
And
by the way…have you ever, just for fun, suspended a hunk of Velveeta
from a height of a few inches, then released the Velveeta to see if it
would bounce?
Try it sometime. It might make you giggle.
 After you play a few rounds of bouncy ball, go ahead and cut it into cubes.
 Then,
to redeem what you’ve just done, grate up a nice amount of sharp
cheddar. (On the show I used cheddar-jack, which is delicious, but I
love the sharpy sharpiness of the sharper sharp cheddar.)
Then,
to redeem what you’ve just done, grate up a nice amount of sharp
cheddar. (On the show I used cheddar-jack, which is delicious, but I
love the sharpy sharpiness of the sharper sharp cheddar.)
(I’m in a little bit of a mood today. Can you tell?)
 Now, making sure the milk/butter combo is nice and heated, drop in the Velveeta.
 Stir it around until the pieces soften…
 And eventually melt into a golden, wonderful sauce.
 Okay: Redemption time again! Drop in the grated cheddar.
 This
is what you call the best of both worlds. The creaminess of the
Velveeta + the natural sharpness of the cheddar = TruLuv4Evr.
This
is what you call the best of both worlds. The creaminess of the
Velveeta + the natural sharpness of the cheddar = TruLuv4Evr.
 Stir
it around until the cheddar begins to melt, then add in some seasoned
salt. I use Lowry’s, but you can use whatever salt blend you like to
reach for during your life’s journey. (Even lemon pepper would be
lovely!) Just don’t leave this out; it makes a really nice difference.
Stir
it around until the cheddar begins to melt, then add in some seasoned
salt. I use Lowry’s, but you can use whatever salt blend you like to
reach for during your life’s journey. (Even lemon pepper would be
lovely!) Just don’t leave this out; it makes a really nice difference.
 Another essential: black pepper! Really go for it, too. A lot goes a little way. Or something like that. Ha.
 Stir it around until the cheese is largely melted…
 Then give it a taste…
 And
add more of whatever you think the sauce needs. Be sure you add enough
seasoned salt for the whole thing to be really, really flavorful!
And
add more of whatever you think the sauce needs. Be sure you add enough
seasoned salt for the whole thing to be really, really flavorful!
(Pssst. You could also press in a clove of garlic and let it heat up with the butter and the milk. That would be crazy good!)
 Cook the pasta until it’s al dente (this isn’t quite there, so I kept cooking it for a little while.)
 Then drain it…
 And pour it right into the sauce!
Oh, the excitement.
Oh, the promise.
Oh, the impatience.
Oh, the AGONY.
 Now just stir it around…
 Until the shells are all coated in the sauce.
 Now,
look at this pan of wonder. It’s somewhat saucy/soupy, and that’s just
the way you want it! It will actually thicken a bit as it sits (not that
it will sit very long) so if it’s a little soupy/saucy to begin with,
there’s a little room to work with.
Now,
look at this pan of wonder. It’s somewhat saucy/soupy, and that’s just
the way you want it! It will actually thicken a bit as it sits (not that
it will sit very long) so if it’s a little soupy/saucy to begin with,
there’s a little room to work with.
 So there it is—the basic, ridonkulously easy, crazily delicious Shells & Cheese. Serve it up like this in all its glory…
Or you can have a little more fun with it.
 Earlier, when I put the pasta water on to boil, I fried up some bacon.
 Then I threw it on the cutting board…
 And chopped it up. But before I added it to the pan…
 I grabbed a bag of frozen peas and poured them right in, ice crystals and all. No need to thaw them first!
 Then in goes the bacon.
 And I just stirred it around.
 Good grief. How lovely does this look?
And maybe “lovely” isn’t the most fitting adjective. Lovely is what you call a salad or a berry dessert or a fizzy drink. I’ll try again.
How gooooooooood does this look?
There. That’s better.
And here are some other things you could stir in: Caramelized onions, finely diced jalapenos, pimientos, halved grape tomatoes…the list goes on!
 Dish it up…and when you do, make sure you get plenty of extra sauce in there.
 A little extra bacon sprinkled over the top makes the world go ’round.
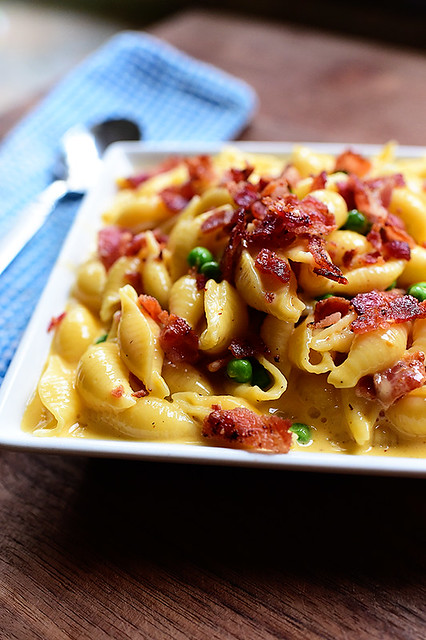 Whoa. Whoa whoa whoa. Like, seriously. Whoa. It’s almost exactly like Pasta Carbonara!
Except…not.
 I’m in love.
Now, just a note: The peas really assert themselves once you mix them in, so start a little light, give it a taste, and you can always add more. I happen to love the flavor of peas, but if you’re on the fence, tread lightly at first.
 This is my serving. Just kidding! Hahaha.
(At least I think I’m kidding.)
Enjoy this, my friends! Here’s the handy dandy printable!
ometimes you feel like making macaroni and cheese that involves whipping up a roux, then making a white sauce, then adding cheese to make it a cheese sauce.
And sometimes you don’t.
This ultra-simple, kid-friendly recipe for pasta shells and cheese is absolutely scrumptious and so darn easy to make.
The secret’s in the (artisan cheese) sauce.
Just you wait, ‘enry ‘iggins. Just you wait…
First, boil up some pasta! These are just good ol’ medium pasta shells, but you can use the small shells if you want. Next, make the gourmet cheese sauce: Add 2 cups of milk (I used 2%) to a saucepan…And
add a pat or two of buttah! And that’s basically the basic basis for
the cheese sauce, basically. Note that there’s no flour, there’s no
roux, and there’s no white sauce. And that’s what’s so beautifully
simple about this recipe!Heat this mixture over medium-low heat until the milk is heated and the butter is melted. And
now, for the artisan cheese blend, which you can only get from
specialty gourmet mail order catalogs: Start with a hunka hunka burnin’
Velveeta. And actually, it would be best if it wasn’t burnin’. Just
straight out of the tight foil wrapper is best. And
by the way…have you ever, just for fun, suspended a hunk of Velveeta
from a height of a few inches, then released the Velveeta to see if it
would bounce?Try it sometime. It might make you giggle.
After you play a few rounds of bouncy ball, go ahead and cut it into cubes.Then,
to redeem what you’ve just done, grate up a nice amount of sharp
cheddar. (On the show I used cheddar-jack, which is delicious, but I
love the sharpy sharpiness of the sharper sharp cheddar.)(I’m in a little bit of a mood today. Can you tell?)
Now, making sure the milk/butter combo is nice and heated, drop in the Velveeta.Stir it around until the pieces soften…And eventually melt into a golden, wonderful sauce.Okay: Redemption time again! Drop in the grated cheddar.This
is what you call the best of both worlds. The creaminess of the
Velveeta + the natural sharpness of the cheddar = TruLuv4Evr.Stir
it around until the cheddar begins to melt, then add in some seasoned
salt. I use Lowry’s, but you can use whatever salt blend you like to
reach for during your life’s journey. (Even lemon pepper would be
lovely!) Just don’t leave this out; it makes a really nice difference.Another essential: black pepper! Really go for it, too. A lot goes a little way. Or something like that. Ha. Stir it around until the cheese is largely melted…Then give it a taste…And
add more of whatever you think the sauce needs. Be sure you add enough
seasoned salt for the whole thing to be really, really flavorful!(Pssst. You could also press in a clove of garlic and let it heat up with the butter and the milk. That would be crazy good!)
Cook the pasta until it’s al dente (this isn’t quite there, so I kept cooking it for a little while.)Then drain it…And pour it right into the sauce!Oh, the excitement.
Oh, the promise.
Oh, the impatience.
Oh, the AGONY.
Now just stir it around…Until the shells are all coated in the sauce.Now,
look at this pan of wonder. It’s somewhat saucy/soupy, and that’s just
the way you want it! It will actually thicken a bit as it sits (not that
it will sit very long) so if it’s a little soupy/saucy to begin with,
there’s a little room to work with.So there it is—the basic, ridonkulously easy, crazily delicious Shells & Cheese. Serve it up like this in all its glory…Or you can have a little more fun with it.
Earlier, when I put the pasta water on to boil, I fried up some bacon. Then I threw it on the cutting board…And chopped it up. But before I added it to the pan…I grabbed a bag of frozen peas and poured them right in, ice crystals and all. No need to thaw them first!Then in goes the bacon.And I just stirred it around.Good grief. How lovely does this look? And maybe “lovely” isn’t the most fitting adjective. Lovely is what you call a salad or a berry dessert or a fizzy drink. I’ll try again.
How gooooooooood does this look?
There. That’s better.
And here are some other things you could stir in: Caramelized onions, finely diced jalapenos, pimientos, halved grape tomatoes…the list goes on!
Dish it up…and when you do, make sure you get plenty of extra sauce in there.A little extra bacon sprinkled over the top makes the world go ’round.Whoa. Whoa whoa whoa. Like, seriously. Whoa. It’s almost exactly like Pasta Carbonara!Except…not.
I’m in love.Now, just a note: The peas really assert themselves once you mix them in, so start a little light, give it a taste, and you can always add more. I happen to love the flavor of peas, but if you’re on the fence, tread lightly at first.
This is my serving. Just kidding! Hahaha. (At least I think I’m kidding.)
Enjoy this, my friends! Here’s the handy dandy printable!
Recipe
Shells & Cheese (with Bacon & Peas)
- Prep Time:
- Cook Time:
- Difficulty:
- Easy
- Servings:
- 6

Ingredients
- 12 ounces, weight Small Or Medium Pasta Shells
- 2 cups 2% Milk
- 1 Tablespoon Butter
- 8 ounces, weight Velveeta, Cut Into Cubes (I Actually Used About 10-12 Ounces!)
- 2 cups Grated Sharp Cheddar Cheese (more To Taste!)
- 1/4 teaspoon Seasoned Salt, More To Taste
- 1/2 teaspoon Black Pepper
- 1/2 cup Frozen Peas (more To Taste)
- 8 slices Thin Bacon, Fried Crisp And Chopped
Preparation Instructions
Cook pasta according to package instructions for al dente (do not overcook). Drain and set aside.
In a large pot heat the milk and butter over medium-low heat. Turn off the heat, then add Velveeta and stir until completely smooth and melted. Stir in the grated cheddar, then add seasoned salt and pepper. Stir until combined, then taste it and add more seasonings if needed.
Add cooked pasta and stir until coated. It will be soupy and saucy, but will thicken slowly.
If desired, stir in frozen peas (they will thaw) and bacon. Serve immediately.
In a large pot heat the milk and butter over medium-low heat. Turn off the heat, then add Velveeta and stir until completely smooth and melted. Stir in the grated cheddar, then add seasoned salt and pepper. Stir until combined, then taste it and add more seasonings if needed.
Add cooked pasta and stir until coated. It will be soupy and saucy, but will thicken slowly.
If desired, stir in frozen peas (they will thaw) and bacon. Serve immediately.
Share this Post
Saturday, June 14, 2014
Lorena's Tortillas
These are so good, you might die. Seriously. The bomb.com.
6 cups of flour
1 cup of shortening (butter flavor is better)
2 cups warm water
1 tsp salt
1 tsp baking powder
Dry ingredients first, then shortening, then warm water. Mix...then divide into balls to make tortillas.
6 cups of flour
1 cup of shortening (butter flavor is better)
2 cups warm water
1 tsp salt
1 tsp baking powder
Dry ingredients first, then shortening, then warm water. Mix...then divide into balls to make tortillas.
Tuesday, December 31, 2013
Shrimp
Jackie Erwin Ladner's Photos
By Jackie Erwin Ladner
Whoa... Melt a stick of #butter in the pan. Slice one #lemon and layer it on top of the butter. Put down fresh #shrimp, then sprinkle one pack of dried #Italian seasoning. Put in the oven and bake at 350 for 15 min. Best Shrimp you will EVER taste :)

Saturday, October 05, 2013
Chicken Salad Recipe
chicken salad sandwiches


Author: kate
Ingredients
- 2 cups cooked chicken, shredded
- 1½ cups red grapes, halved
- 2 cups chopped celery
- ½ cup slivered almonds
- ½ cup miracle whip
- ⅔ cup mayo
- ½ teaspoon Mrs. Dash Original Seasoning
- ⅛ teaspoon garlic powder
- ½ teaspoon salt
Instructions
- to make the filling, mix together in a large bowl the chicken, grapes, celery, and almonds.
- to make the dressing, whisk together in a small bowl the miracle whip, mayo, seasoning, garlic powder, and salt.
- add dressing to the filling and stir to combine.
- *if possible, refrigerate for 1-2 hours before serving, adding the almonds just before serving.
- serve on top of your favorite bread, roll, or croissant. enjoy!
Read more: http://www.livecrafteat.com/eat/chicken-salad-sandwiches/#ixzz2grLR4QUG
Saturday, September 28, 2013
Canning Salsa Recipe
5 gallon bucket of tomatoes
6 medium onions
3 jalapenos
8-10 green chiles
4 green peppers
3 tsp black pepper
3 tsp cayenne pepper
5 tablespoons of salt
3/4 cup cider vinegar
7 T lemon juice
2 -29 oz tomato sauce
3-9oz tomato paste
2 cups sugar
3 cloves of garlic
Makes 30 Quarts? or 25 Pints?
Not sure but delicious. You don't have to boil the jars.
Put all ingredients (after diced/chopped etc) in big pot to boil. When rolling boil, put in jars.
Don't forget to take skins off tomatoes.....YUMSTERS.
6 medium onions
3 jalapenos
8-10 green chiles
4 green peppers
3 tsp black pepper
3 tsp cayenne pepper
5 tablespoons of salt
3/4 cup cider vinegar
7 T lemon juice
2 -29 oz tomato sauce
3-9oz tomato paste
2 cups sugar
3 cloves of garlic
Makes 30 Quarts? or 25 Pints?
Not sure but delicious. You don't have to boil the jars.
Put all ingredients (after diced/chopped etc) in big pot to boil. When rolling boil, put in jars.
Don't forget to take skins off tomatoes.....YUMSTERS.
Sunday, December 23, 2012
Wednesday, April 11, 2012
Best Guacamole Evah!
My cousin Hyrum Weight joined us for Easter at my Mom's home. He made some guacamole. Let's just say I have NEVER liked guacamole. But it looked soooo, sooo good. Guess what. I fell in love with that guacamole. And so did all my kids. And it was inhaled by our whole family. So, I got the recipe...as I have been craving it since that day. AMAZING.
4 avocados
1 lime juiced
1/2 small red onion diced
1 large garlic clove minced
1 tomato diced
3/4 tsp salt
1/2 tsp freshly ground black pepper
1 Tbsp drained salsa
1 to 1.5 tsp Tabasco sauce
If you want to go authentic leave out the drained salsa and add 1/2 diced Jalapeño and dial back the Tabasco to 1/2 tsp. I would suggest tasting your guacamole after adding salt, pepper, Tabasco, drained salsa/Jalapeño, etc. Adjust amounts according to taste preference.
4 avocados
1 lime juiced
1/2 small red onion diced
1 large garlic clove minced
1 tomato diced
3/4 tsp salt
1/2 tsp freshly ground black pepper
1 Tbsp drained salsa
1 to 1.5 tsp Tabasco sauce
If you want to go authentic leave out the drained salsa and add 1/2 diced Jalapeño and dial back the Tabasco to 1/2 tsp. I would suggest tasting your guacamole after adding salt, pepper, Tabasco, drained salsa/Jalapeño, etc. Adjust amounts according to taste preference.
Monday, January 02, 2012
Best Fresh Salsa Recipe
I could drink this and just maybe I have. SO delicious. This is the Barzee recipe for salsa:
6 roma tomatoes
white onion (one thick part slice)
green onions (about 1/3 of bunch, about a handful)
cilantro (handful) (chop after separating leaves)
A whole lime
salt to taste.
Hand chop
6 roma tomatoes
white onion (one thick part slice)
green onions (about 1/3 of bunch, about a handful)
cilantro (handful) (chop after separating leaves)
A whole lime
salt to taste.
Hand chop
Saturday, April 02, 2011
chicken enchiladas
About 3 chicken breasts
Milk
Flour
Can green chilis
flour tortillas
yellow cheese
jack cheese
sour cream
onions
1lb chicken
3 tblspoons butter
cup of milk
12 oz jack cheese
1/3 cup chopped onionis
4 tablespoons flour
can chilis
2 oz cheeder cheese
8 oz sourcream
suate onions in butter add flour and milk until thick add chilis add 1/3 chilis and melt add chicken remove from heat and add sourcream. Roll up tortillas add rest of cheese heat at 350 degrees.
Milk
Flour
Can green chilis
flour tortillas
yellow cheese
jack cheese
sour cream
onions
1lb chicken
3 tblspoons butter
cup of milk
12 oz jack cheese
1/3 cup chopped onionis
4 tablespoons flour
can chilis
2 oz cheeder cheese
8 oz sourcream
suate onions in butter add flour and milk until thick add chilis add 1/3 chilis and melt add chicken remove from heat and add sourcream. Roll up tortillas add rest of cheese heat at 350 degrees.
Wednesday, March 16, 2011
Chili's Salsa
A co-worker made this for our work yesterday and wow! Superfabulous!
Chili's Salsa
1 can (14.5 ounce) tomatoes and green chilies (Rotel brand)
1 can (14.5 ounce) whole canned tomatoes (plus the juice)
4 teaspoons jalapenos (canned, diced NOT pickled)
1/4 cup yellow onions (I'm lazy and use dehydrated onion flakes)
3/4 teaspoon garlic salt (Or I use combination of garlic powder and dehyrdrated minced garlic)
1/2 teaspoon cumin
1/4 teaspoon sugar
Combine in blender and blend/puree. Cover and chill. A couple of hours of chilling will help blend and enrich the flavor.
Chili's Salsa
1 can (14.5 ounce) tomatoes and green chilies (Rotel brand)
1 can (14.5 ounce) whole canned tomatoes (plus the juice)
4 teaspoons jalapenos (canned, diced NOT pickled)
1/4 cup yellow onions (I'm lazy and use dehydrated onion flakes)
3/4 teaspoon garlic salt (Or I use combination of garlic powder and dehyrdrated minced garlic)
1/2 teaspoon cumin
1/4 teaspoon sugar
Combine in blender and blend/puree. Cover and chill. A couple of hours of chilling will help blend and enrich the flavor.
Wednesday, February 09, 2011
Valentine divinity
Pink Valentine Divinity
3 c. sugar
3/4 c. water
1 (3 oz.) pkg. pink Jell-o {cherry, strawberry, raspberry}
3/4 c. light corn syrup
2 egg whites
Directions
1. Line a counter top with some wax paper. Spray the inside of 2 pastry bags or 1 large zip lock bag with cooking spray.
2. Combine sugar, water and syrup in saucepan. Bring to a boil, stirring occasionally. Reduce heat; continue cooking, stirring occasionally to 260 degrees (hard ball stage). After it reaches a boil, it will take about 20 minutes to get to 260 degrees. A candy thermometer is very helpful!
3. After the sugar mixture has boiled and you're waiting for it to hit 260 degrees, beat egg whites until fluffy using a stand mixer. Slowly add dry gelatin. Continue to beat until egg whites hold stiff peaks.
4. Once it reaches 260 degrees, slowly pour hot syrup in thin stream into egg whites, beating all the while. Beat until candy looses gloss, about 10 minutes. You can tell it's ready when it appears to be able to keep it's shape well.
5. At this point, you can either drop by spoonfuls onto the wax paper or be fancy and fill the pastry bag and pipe it into shapes. The pastry bag option really isn't hard, but I'd suggest filling the bags first, then piping the shapes. After the divinity is ready to be piped, you have about 10 minutes before it's too hard to do anything with. So fill both bags {or one zip lock bag, then cut the tip} and then pipe both bags, one right after the other. Work as quickly as possible!
Let the candy dry on the counter top for at least 12 hours. If it's raining or snowing, it will take longer to dry as the air is more humid.
Decorate with chocolate hearts, sprinkles, chocolate chips, etc. Enjoy!
3 c. sugar
3/4 c. water
1 (3 oz.) pkg. pink Jell-o {cherry, strawberry, raspberry}
3/4 c. light corn syrup
2 egg whites
Directions
1. Line a counter top with some wax paper. Spray the inside of 2 pastry bags or 1 large zip lock bag with cooking spray.
2. Combine sugar, water and syrup in saucepan. Bring to a boil, stirring occasionally. Reduce heat; continue cooking, stirring occasionally to 260 degrees (hard ball stage). After it reaches a boil, it will take about 20 minutes to get to 260 degrees. A candy thermometer is very helpful!
3. After the sugar mixture has boiled and you're waiting for it to hit 260 degrees, beat egg whites until fluffy using a stand mixer. Slowly add dry gelatin. Continue to beat until egg whites hold stiff peaks.
4. Once it reaches 260 degrees, slowly pour hot syrup in thin stream into egg whites, beating all the while. Beat until candy looses gloss, about 10 minutes. You can tell it's ready when it appears to be able to keep it's shape well.
5. At this point, you can either drop by spoonfuls onto the wax paper or be fancy and fill the pastry bag and pipe it into shapes. The pastry bag option really isn't hard, but I'd suggest filling the bags first, then piping the shapes. After the divinity is ready to be piped, you have about 10 minutes before it's too hard to do anything with. So fill both bags {or one zip lock bag, then cut the tip} and then pipe both bags, one right after the other. Work as quickly as possible!
Let the candy dry on the counter top for at least 12 hours. If it's raining or snowing, it will take longer to dry as the air is more humid.
Decorate with chocolate hearts, sprinkles, chocolate chips, etc. Enjoy!
Monday, December 21, 2009
Out of this world dip!
And I am not talking about myself:)
I went to my friend Miss Melissa's annual Christmas party. At the party, she had this dip. I practically inhaled this dip. It is the best dip I have ever tasted. And this is coming from a big girl who enjoys herself some food. So you can trust.....this will be worth the couple minutes it takes to throw this together. SO scrumptious with crackers.
2 boxes of cream cheese
1 cup of mayo (real---not Miracle Whip_
1 can of jalapenos
1 can of green chiles chopped
Mix it all together, heat it up for a couple minutes in the microwave, and then add some fresh grated parmesan cheese.
You will think you have died and gone to heaven. And then you won't really care about a touch of weight gain over the holidays:)
I went to my friend Miss Melissa's annual Christmas party. At the party, she had this dip. I practically inhaled this dip. It is the best dip I have ever tasted. And this is coming from a big girl who enjoys herself some food. So you can trust.....this will be worth the couple minutes it takes to throw this together. SO scrumptious with crackers.
2 boxes of cream cheese
1 cup of mayo (real---not Miracle Whip_
1 can of jalapenos
1 can of green chiles chopped
Mix it all together, heat it up for a couple minutes in the microwave, and then add some fresh grated parmesan cheese.
You will think you have died and gone to heaven. And then you won't really care about a touch of weight gain over the holidays:)
Tuesday, September 15, 2009
A recipe to write home about (or blog about)
Some of the sayings are outdated....................................Brandon's version of Fleming's potatoes
Perfect for Fall and winter. Don't you just want some warm, comfort food? While wearing a sweater?


As you can see, Brandon did a great job, they tasted just like the REAL deal you can see here (from Flemings)
For our anniversary, Brandon took me to Fleming's Steakhouse. Every morsel was captivating and that is coming from a bigger girl who really enjoys good food. (Sometimes you can't take recommendations from skinny girls; I mean have they REALLY tried all the options? I don't think so, or they wouldn't look that way. ) I, on the other hand, can be trusted as your trusted "good food" consultant. As you can see, I have tried pretty much everything, unless it is an egg derivative of some sort.
When I came upon Fleming's potatoes, I really thought I might just die of taste bud ecstasy.
So, for my birthday, my sweet husband found the recipe online, and made it from scratch. And on a Sunday, when you can't go out, there is nothing better than made-from-home restaurant goodness.
He tripled the recipe, and like lasagna, it is better each day---up to a certain point, I am sure!!!
It was funny, I re-heated some yesterday for lunch for myself, and Mad, Benj, and Dylan wanted some. They didn't get that this is food that is too good for children. So, even though these potatoes are quite a precious commodity around here, I divied out 2 potatoe slices to each child (as they are not "going green" and don't conserve anything---which is a mortal sin when it comes to these potatoes.) Well, ofcourse, for the first time ever, they ate them all, each last one, and I had to reheat more. I divied out more, they finished those and wanted more. Of all things for them to like..........................
So, I am saying in way too many words that this is a hit for both adults and kids.
Just so you know, the cooking time was WAY longer than the recipe gave.
You really have to try these.
From CDkitchen website:
Ready in: 1-2 hrs
Difficulty: 3 (1=easiest :: hardest=5)
Serves/Makes: 6
Ingredients:
3 tablespoons butter
1/4 cup fresh jalapeño peppers, seeded and finely diced
1/2 cup leeks, cleaned, ends cut off; use bottom three inches, 1/2-inch dice
2 cloves garlic, minced
1 teaspoon kosher salt
1/2 teaspoon black pepper, fine grind
1 1/4 cup heavy cream
1 cup half & half
4 ounces Cheddar cheese, grated
4 ounces Jack cheese, grated
4 large Idaho russet potatoes, peeled and sliced into thin rounds (about 1/16-inch thick)
Turn this recipe into a puzzle! [click]
Directions:
Melt butter in a medium saucepan over medium-high heat. Add jalapeños, leeks, garlic, salt and pepper and sauté for 4 to 5 minutes, stirring constantly.
Add cream and half & half and bring to a simmer. When cream is hot, remove pan from stove. Stir in both cheeses and blend thoroughly.
Place potato slices in a large mixing bowl. Add cream mixture to bowl, folding potatoes and sauce gently together.
Spray a 9-by-13-inch glass baking dish with non-stick coating. Pour in potato mixture and evenly distribute potatoes and sauce.
Cover tightly with aluminum foil. Bake in a preheated 350-degree oven for 45 minutes.
Remove foil and cook an additional 15 minutes to brown potatoes.
Recipe from Fleming's Prime Steakhouse & Wine Bar.
Nutritional information per serving: 384 cal., 31 g fat (19 g sat.), 101 mg chol., 17 g carb., 465 mg sodium, 2 g fiber, 11 g pro.
This recipe from CDKitchen for Fleming's Potatoes serves/makes 6
Perfect for Fall and winter. Don't you just want some warm, comfort food? While wearing a sweater?


As you can see, Brandon did a great job, they tasted just like the REAL deal you can see here (from Flemings)
For our anniversary, Brandon took me to Fleming's Steakhouse. Every morsel was captivating and that is coming from a bigger girl who really enjoys good food. (Sometimes you can't take recommendations from skinny girls; I mean have they REALLY tried all the options? I don't think so, or they wouldn't look that way. ) I, on the other hand, can be trusted as your trusted "good food" consultant. As you can see, I have tried pretty much everything, unless it is an egg derivative of some sort.
When I came upon Fleming's potatoes, I really thought I might just die of taste bud ecstasy.
So, for my birthday, my sweet husband found the recipe online, and made it from scratch. And on a Sunday, when you can't go out, there is nothing better than made-from-home restaurant goodness.
He tripled the recipe, and like lasagna, it is better each day---up to a certain point, I am sure!!!
It was funny, I re-heated some yesterday for lunch for myself, and Mad, Benj, and Dylan wanted some. They didn't get that this is food that is too good for children. So, even though these potatoes are quite a precious commodity around here, I divied out 2 potatoe slices to each child (as they are not "going green" and don't conserve anything---which is a mortal sin when it comes to these potatoes.) Well, ofcourse, for the first time ever, they ate them all, each last one, and I had to reheat more. I divied out more, they finished those and wanted more. Of all things for them to like..........................
So, I am saying in way too many words that this is a hit for both adults and kids.
Just so you know, the cooking time was WAY longer than the recipe gave.
You really have to try these.
From CDkitchen website:
Ready in: 1-2 hrs
Difficulty: 3 (1=easiest :: hardest=5)
Serves/Makes: 6
Ingredients:
3 tablespoons butter
1/4 cup fresh jalapeño peppers, seeded and finely diced
1/2 cup leeks, cleaned, ends cut off; use bottom three inches, 1/2-inch dice
2 cloves garlic, minced
1 teaspoon kosher salt
1/2 teaspoon black pepper, fine grind
1 1/4 cup heavy cream
1 cup half & half
4 ounces Cheddar cheese, grated
4 ounces Jack cheese, grated
4 large Idaho russet potatoes, peeled and sliced into thin rounds (about 1/16-inch thick)
Turn this recipe into a puzzle! [click]
Directions:
Melt butter in a medium saucepan over medium-high heat. Add jalapeños, leeks, garlic, salt and pepper and sauté for 4 to 5 minutes, stirring constantly.
Add cream and half & half and bring to a simmer. When cream is hot, remove pan from stove. Stir in both cheeses and blend thoroughly.
Place potato slices in a large mixing bowl. Add cream mixture to bowl, folding potatoes and sauce gently together.
Spray a 9-by-13-inch glass baking dish with non-stick coating. Pour in potato mixture and evenly distribute potatoes and sauce.
Cover tightly with aluminum foil. Bake in a preheated 350-degree oven for 45 minutes.
Remove foil and cook an additional 15 minutes to brown potatoes.
Recipe from Fleming's Prime Steakhouse & Wine Bar.
Nutritional information per serving: 384 cal., 31 g fat (19 g sat.), 101 mg chol., 17 g carb., 465 mg sodium, 2 g fiber, 11 g pro.
This recipe from CDKitchen for Fleming's Potatoes serves/makes 6
Wednesday, December 24, 2008
Hot Beef Dip
This is my husband's favorite dip that he loves for the holidays! His parents are here, and his Mom made him his favorite! Here is the recipe:
Saute 1/4 cup onions in one tablespoon of butter
Add 1 cup of milk
Add 8 oz. of cream cheese
(Heat it all till the cheese melts)
Add 4 oz. of drained mushrooms
Add 2 1/2 oz. of the chipped beef (Buddig Smoked Chopped and Pressed Beef)
Add 1/4 cup parmesan cheese
Add 2 tablespoons of parsley
Add 1 tsp of garlic powder
Serve with Fritos.
A great party dip!
My husband's all time favorite.
Sunday, November 30, 2008
Rice Pilaf with Shrimp

One of my favorite "recipes" if you can call it that. Such a fabulous side dish. We cook it frequently and on every special occasion. It is easy to make, delicious to eat, and adults and kids love it.
This is how easy it is.
Buy a package or two of Rice-A-Roni Rice Pilaf.
Cook with their directions.
Sautee shrimp (I prefer salad shrimp) with some butter.
Sautee onions--don't forget the butter..
Put them all together. We always try to be friendly with the butter, and wow!
Devour.
After you have made it once, I guarantee it will become a regular entree in your family. It is one of our family favorites.
Tuesday, September 30, 2008
Yummy Rolls


Do you want some yummy, easy rolls? My sister-in-law Jen used to always make these for us (when she lived in Utah) and we all just LOVED them. It is such an easy recipe, and always a hit with the family. So, here goes---
You need frozen Rhodes rolls.
Get a bundt pan.
Line up the frozen Rhodes rolls in the bundt pan.
Let them rise for a couple hours.
Pour a melted stick of butter all over the top of the risen rolls.
Bake on 350 degrees for about 20 minutes.
Flip the bundt pan, for beautiful, divided rolls.
So delicious.
And, due to the bundt pan, and the little rolls, they naturally divide. And are beautiful. A great, delicious, centerpiece to any meal.
If you notice a little residue in my pictures, note I am showing the process in reverse and had already cooked some in the pan. I wasn't planning on the photo op for the rolls, but they begged to be put on my blog, and who am I to say no to bread of any kind? So, after baking them, and putting them on a plate, I added more frozen rolls to the pan. I guess we are having more rolls tomorrow. I don't think there will be any complaints.
Wednesday, September 10, 2008
Easy Meal Ideas

So, a couple times we have bought the Family Size, frozen, "Southwestern Style Rice and Beef" Complete Skillet Meal (Green Giant). I have liked the flavor of this frozen meal more than other conglomerations. Anyway, I decided to stretch the frozen meal. I added a lot of mozarella cheese, and 3 cups of Minute Rice. It worked out well, very tasty. The kids LOVE it. I even put it in a tortilla with a little bit of ranch dressing (Gregg's Ranch Dressing from Costco). It is imperative that you use a really great ranch dressing. With a little ranch with it, I felt like I was having the homemade version of a bean and rice burrito from Costa Vida or Cafe Rio. SOOOO yummy if you are wanting some of that flavor. Whenever Fall starts to roll around, suddenly I feel like cooking again. (I know, it is a little sorry that my idea of cooking involves a frozen skillet meal). After cooking this for lunch, my son Benjamin (3) told me that I am the best cooker in the world. And who am I to argue with him?
I am also doing my lazy girl lasagna for tonight. You throw the frozen ravioli in the crock pot, several cans of Prego sauce, and lots of mozarella cheese. Delicious and easy. My kids always tell me it is delicious!
Hey, how about everyone out there share a great, easy recipe for some fun Fall cooking! That way we can all enjoy some new recipes.
Subscribe to:
Posts (Atom)